Teapotcoder2018-10-03T20:02:25.184Zhttp://teapotcoder.com/David RobertsHexoUsing git with self signed certificateshttp://teapotcoder.com/post/using-git-with-self-signed-certificates/2018-10-04T00:41:16.000Z2018-10-03T20:02:25.184ZUsing git internally to access an external git repository? Behind a corporate proxy that has an self signed CA cert? Is git complaining about ‘SSL certificate problem: unable to get local issuer certificate’? Here ya go.
High level:
Get the self-signed cert in a base 64 encoded file.
git config http.sslCAInfo “path/to/that/file.cer”
You will hear a lot about setting http.sslVerify to false. Please don’t do this. If you leave the environment having the self-signed cert then git will not be verifying any TLS/SSL traffic, opening you up to man in the middle attacks.
Detailed with scripts for Windows (I’ll work on Linux later).
You need to get the self-signed certificate in a base 64 encoded file. There are a couple ways to do this depending on your situation.
On Windows when the certificate is only available from the remote git server itself.
On Windows when the certificate is in the Windows cert store.
This may be typical for corporate environments. Easy to tell, if git complains about self-signed cert but your Chrome or Edge browser doesn’t complain then it’s likely the cert is already on your computer.
1
2
3
4
5
# powershell $rootCA = dir Cert:\LocalMachine\Root | Where DnsNameList -Contains"NAME OF YOUR ROOT CA CERT" | Select -First 1 $rootCA = @("-----BEGIN CERTIFICATE-----",[System.Convert]::ToBase64String($rootCA.RawData),"-----END CERTIFICATE-----") $rootCAPath = "$Home\where-you-want-the-file-ca.cer" $rootCA | Out-File$rootCAPath -Encoding ascii
The Where above may need to be modified to find the appropriate cert in your cert store.
I must thank Philip Kelly for posting an article on this exact situation back in 2014. I also want to say thank you to Alejandro Campos Magencio for the post on getting the certificate chain. I put those two together with the exporting of the certifcate to a file to produce this post.
]]>
<p>Using git internally to access an external git repository? Behind a corporate proxy that has an self signed CA cert? Is git complaining a
How to fix git ssh asking for password on Windows 10http://teapotcoder.com/post/how-to-fix-git-ssh-asking-for-password-on-windows-10/2018-09-20T08:39:14.000Z2018-10-03T20:02:25.183ZTL;DR
1
Get-Command ssh
If the output of that lists an executable not in your git usr/bin directory then do this:
When you install git, it comes with ssh. But if you have a newer version of Windows 10, Windows has an install of SSH that comes with it. Installed in C:\Windows\System32\OpenSSH. That gets put into the environment PATH and so testing:
1
ssh-Tgit@github.com
Uses your key you added via ssh-add using the Windows provided binaries. But git is using the ssh stuff within the git usr/bin folder. Different set of keys. So you’d end up getting prompted for your passphrase every single time you git pull.
Nearly drove me crazy, this did.
]]>
<p>TL;DR<br><figure class="highlight ebnf"><table><tr><td class="gutter"><pre><span class="line">1</span><br></pre></td><td class="code"><pr
VSTS: Disable features/services APIhttp://teapotcoder.com/post/vsts-disable-features-services-api/2018-06-29T02:01:51.000Z2018-10-03T20:02:25.184ZVSTS is rolling out a new navigation. One of the features in it is the ability to turn off certain services/features, such as Test, Build and Release, etc. But you have to go into each project individually. That’s manual work, I want to automate it.
So if you want to disable some services/features in VSTS across multiple projects there is a REST API that you can use. It’s in preview, and you’ll have to script the calls but here you go:
Same payload, in that case you are simply ignoring the project. However, this doesn’t actually remove the service/feature from all the projects. What it does is removes them from the services page. You won’t even see a ‘Build and Release’ toggle for example. So be careful, if you disable a service at the host level but it’s enabled at the project level (or undefined) then the project can still use that service as usual, but you won’t be able to turn it on/off via the new navigation ui.
]]>
<p>VSTS is rolling out a <a href="https://blogs.msdn.microsoft.com/devops/2018/06/19/new-navigation/" target="_blank" rel="noopener">new nav
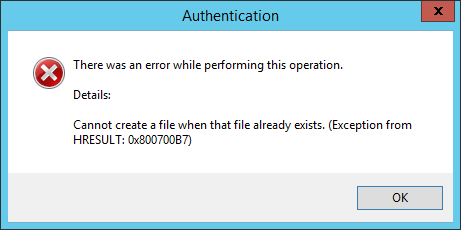
IIS Cannot create filehttp://teapotcoder.com/post/iis-cannot-create-file/2016-08-18T09:45:13.238Z2018-10-03T20:02:25.183ZI just helped a co-worker deploy a ASP.NET MVC app to a new server. But the IIS Powershell cmdlet kept failing saying:
Cannot create a file when that file already exists.
The eventual source of the problem didn`t fall in line with the error message, big surprise I know.
TL;DR
Check your app settings for duplicates.
A bit longer
Part of my deployment process using Octopus Deploy is to set the authentication settings for the web application. Octopus Deploy was helpful in giving quick easy access to the error log. I didn`t need to hunt down and ask why it was failing. Just had to figure out what was actually wrong with my scripting. Using Powershell trying to enable anonymous authentication:
Set-WebConfigurationProperty : Cannot create a filewhen that file already exists. (Exceptionfrom HRESULT: 0x800700B7)
I’m familiar with this error but usually with the Start-Website cmdlet. In that case it usually means that you have two sites with the same bindings. That’s likely due to creating a new site and not removing the default, thus having two sites listening on port 80 or port 443 with same host header. But that wasn’t the case here.
So what made me think there was something wrong with the web.config file? Experience. So I just started with something simple to eliminate it as a problem. The appSettings, surely that’s not part of the problem. However, that was exactly the problem. Usually ASP.NET will tell you that you have duplicate configuration items, but in this case it didn`t for whatever reason. It only gave the error above. It will also give you a similar error if you try to edit the authentication (or other) settings via the IIS GUI.
Rule of thumb, don`t trust the error messages to tell you what your problem is. It’ll only tell you what its problem is.
And make sure you don’t have duplicate app setting entries in your web.config.
]]>
<p>I just helped a co-worker deploy a ASP.NET MVC app to a new server. But the IIS Powershell cmdlet kept failing saying:</p>
<p><code>Cannot create a file when that file already exists.</code></p>
<p>The eventual source of the problem didn`t fall in line with the error message, big surprise I know.<br>
Post site screenshots to Github PRhttp://teapotcoder.com/post/post-site-screenshots-to-github-pr/2015-11-19T05:41:21.000Z2018-10-03T20:02:25.184ZI continue the automation of hexo.io by taking the website screenshots generated during the continuous integration proccess and posting them to the Github PR as a comment. The code you are about to see is not the prettiest JavaScript you will see. But I felt it would be beneficial to see this code evolve over time. I’ll make additional posts talking about how I improve things with this. You can see the full repository on my Github account, suede-halibut.
What it does
This node app is just a RESTish/ful/whatever API. When CircleCI is done with the build it will issue a POST to the ‘/pr-build-completion’ url of my deployed heroku app. The request body from CircleCI contains the project name, the build number and the pull request number among many other things. The app will call into CircleCI to get the artifacts for that build number of that project. Then take the image artifacts and post them to the Github PR that triggered the CircleCI build.
How it does it
First thing to do. Pick a Node.js web application framework. For this I picked Express.js because it seemed the simplest to work with for such a simple app as this.
Getting all the things
My app.js is where my Express.js app lives and is configured. The first part contains all the requirements and initial objects.
1 2 3 4 5 6 7
var request = require("request"); var poster = require("./postissue");
var bodyParser = require("body-parser"); var express = require("express"); var app = express(); var router = express.Router();
request is for making HTTP requests to CircleCI. poster is my own module that does the actual posting of images to the Github PR. bodyParser is Express.js middleware for parsing the request body as JSON. Then you see Express.js, the creation of the app and getting the Express.js router.
Get the configuration
I need some private information to be able to talk to CircleCI and to Github. These environment variables are set in heroku manually.
The way it’s setup right now is that it only works for one Github organization/account. At the time of writing that’s just techlahoma. That’s the same for the CircleCI part as well because it’s using the name of the Github account as the CI account. It was a little confusing at first but CircleCI just ‘follows’ a repository so goes along with that nomenclature. Just using API keys for CircleCI and Github. You never want to have to use your actual username and password for automation. An API key shows up as you but can’t be used to login as you to the website. So it’s likely not able to change your normal login password.
Smoke test route and request logging.
Because I’m new to Express.js and to Node apps in general I wanted to create a simple route in Express.js that would let me know I did at least one thing right. Also, because Express.js is awesome it was trivial to add my own middleware to log requests coming in.
router.get("/", function(req, res) { res.send("Ready when you are"); });
If you are not familiar with Express.js most of that should still make some sense. First the log part. router.use inserts middleware into the request pipeline. In this case it is an anonymous function that just sends some of the details of the request to the console. next(); is the callback I have to call to allow the pipeline to continue. If I don’t call that function then the pipeline stops there. This happens for every request that comes in that is matched to any route.
The router.get defines a route that Express.js will respond to. The get part defines the HTTP method. Then you see the URL path which is the root of the site in this case. The function called by Express.js receives the request object and a response object to write a response. All I do here is write out a message that let’s me know I actually hit the site.
The POST
The next route is the main one for this app. It’s the only other route defined. It’s a bit long so I’ll step through it in chunks.
The route is defined to respond to POST requests made to the /pr-build-completion url. That bodyParser.json() is middleware injection. Actually what’s really going on is the first parameter is the path to respond to; the rest are just taken by Express.js as a series of callbacks to execute for the matching request. Check out the docs on router methods. I really like this part of Express.js. Make’s it very easy to individually break up request handling. But that’s for another post.
Then I get the relevant data from the request body.
1 2 3 4
console.log("POST build completion"); var project = req.body.payload.reponame; var build = req.body.payload.build_num; var pull = req.body.payload.pull_request_urls[0];
I get the name of the repository that triggered the build, the build number in CircleCI the artifacts of interest are located, and the pull request urls in Github that triggered the build.
You’ll notice it says pull_request_urls and I just get the first one. I am not sure of a situation where multiple PRs will trigger a single build but in any case there should be one here. Actually there won’t be during builds triggered by merging to master but that’s a defect that I’ll deal with in a later post.
Next I tease out the PR number.
1 2
pull = pull.substring(pull.lastIndexOf("/") + 1); console.log("--for build %s of pull %s in the %s project", build, pull, project);
I just need the number so I know which PR to add the comment to a bit later.
Build the CircleCI url to get the build artifacts.
Specifying the url and saying we want JSON back in the response. Remember this is the HTTP request going out to CircleCI to get the artifacts for the build.
The first thing to do with the response is parse the JSON body and get just the url for any images in the artifacts.
1 2 3 4
console.log("Retrieved the artifacts payload"); var payload = JSON.parse(body); var screenshots = payload.map(theUrl).filter(forImages); console.log(screenshots);
This is not Express.js routing thus why I’m parsing the JSON manually. The payload is an array of urls to the artifacts for the build. This is a separate HTTP request going out. Also note I’m going a bit functional here. I had fun with this part as I had just watched a few JavaScript videos by Mattias P Johansson aka mpjme. Very educational and enjoyable to watch. I highly recommend you watch them soon. Anyway I have two functions defined at the end of app.js to handle that map and filter of the parsed payload from CircleCI.
theUrl just maps the larger artifact object to just it’s url and a name to use in the PR comment. forImages filters out everything except for the screenshots generated during the build. When used in the mapping and filtering of the payload I really like how it reads.
Back to the handling of the artifact response. After getting just the data we need from the payload we apply a little configuration and use my poster module to send the images to the Github PR.
1
2
3
4
5
6
7
8
console.log("Posting to Github PR"); settings.prNumber = pull; settings.repoName = project;
First off, I don’t like that I’m using the settings object to communicate additional details for the poster to use. At least I’m putting that in as a parameter but it still feels a bit off. That’ll be a later post. But I give it those settings so it knows where to put the screenshots supplied in the second argument. Finally a callback that will just return a simple ‘yep’ to the originall caller. CircleCI in this case but I do the ‘yep’ for testing.
Starting Express.js
So we’ve defined the primary route we want. Now we tell Express.js to start listening.
1 2 3 4 5 6 7 8 9
app.use("/", router);
var port = process.env["PORT"] || 8080; var ipaddress = "127.0.0.1";
console.log("Preparing to listen on %s:%d", ipaddress, port); var server = app.listen(port, function() { console.log('%s: Node server started on %s:%d ...', Date(Date.now() ), ipaddress, port); });
First we tell Express.js to use ‘/‘ as the base path for all routes defined in the router object. This is useful in the case where you have different sections of your app and you don’t want to have to repeate the same root part of the path. Think of an admin section verses the normal part of the website.
Then get the port and ip address that will be used to tell Express.js what to listen on. I originally did this on OpenShift so that’s where the IP address comes in but it’s not used on heroku.
See, real code, none of that nice, clean, prepared stuff.
The poster
The poster is my own module in postissue.js. It’s what takes the urls of the screenshots and puts them in the Github PR comment. When it’ called the first thing we do is prepare the info for connecting to the Github API.
1 2 3 4 5 6 7 8 9
var GithubApi = require("github");
module.exports.postImagesToIssue = function(settings, cdnUrls, callback) { var github = new GithubApi({ version: "3.0.0", protocol: "https", host: "api.github.com", timeout: 5000 });
I’m using the Github package to handle all the HTTP requests to Github’s api.
I’m simply concatenating the name of the image and the url to it for each image that was generated during the build. The ‘’ part is the markdown for pulling in an image.
First some logging for diagnosis later on when needed. The user in this case will be ‘techlahoma’. The repo is equivalent to the website. ‘okcsharp-website’ in my case at the moment. But that is gathered from what CircleCI tells us. So if I just setup a different build within the techlahoma organization it should just work. The pull request number triggering the build and then finally the comment with the markdown.
Once that request has completed it executes the callback function provided. It just sends the results to the console for diagnosis later on when needed.
The last thing I do here is execute the callback given. Which in this case just allowes the route handling to continue by writing the response.
In closing
Overall it works very well. You can push a commit to a PR and stay on the PR page. In a few minutes you will see Github display the new comment without doing anything yourself. This let’s me and other organizers see the resulting changes in a mostly accurate way; without having to pull it down and run hexo.io ourselves.
In fact the December post for the OKCsharp website was done completely in the Github UI. I made a new file and committed it to a new branch in my fork. Sent it as a PR. Waited to see the screenshots looked correct. I noticed an error, made the correction, saw the new screenshots in the PR then merged. All directly from the Github website. Neat.
]]>
<p>I continue the <a href="/post/automating-static-sites-with-hexo-io-circleci-and-github-pages/">automation of hexo.io</a> by taking the <a href="/post/generate-screenshots-of-website-during-build/">website screenshots</a> generated during the continuous integration proccess and posting them to the Github PR as a comment.<br>
Generate screenshots of hexo websites during buildhttp://teapotcoder.com/post/generate-screenshots-of-website-during-build/2015-11-07T06:00:00.000Z2018-10-03T20:02:25.183ZIn this post I continue detailing the automation of hexo.io by generating screenshots of the generated site. This is primarily useful when it is run in the continuous integration process so I can quickly check on content submissions. Something you have to understand is asynchronous work in JavaScript. Callbacks, async, promises, promises, promises. I don’t need a promise, just need it to work. Eventually I chose the async npm package because I got it to work and the queue made sense for the moment. The queue function will call the given task function for every item in the queue. Here is an example of using async.queue.
// Define the 'task' objects which // will be passed into the queue function var tasks = [ {name: "John", age:42}, {name: "Susan", age:35} ];
// Create new queue passing in the function that will be // called for every task object pushed to the queue var queue = async.queue(function(task, callback) { console.log("%s is %d years old.", task.name, task.age); // If there was an error pass it into the callback callback(); });
// Define a function to be called when the last item // in the queue is returned from the worker/task function queue.drain = function(err) { console.log("Last item returned from worker"); console.log("Err (if any):"); console.log(err); };
// Filling the queue queue.push(tasks[0]); queue.push(tasks[1]); console.log("Done");
Each item will be processed concurrently if possible. There is no guarantee as to the order the task objects will be processed. So make sure to do some setup before hand if needed. You can view the whole file on GitHub if you want. But I will be going over each part below.
My goal for this step of my hexo site deployment is to generate screenshots. For that I use PhantomJS. With PhantomJS I can simulate the browser at various window sizes and urls snapping screenshots along the way. First up, get the tools for the job. After installing PhantomJS and the async npm package I start a screenshots.js file.
Get the needed modules for the script.
1 2 3
var system = require("system"); var webpage = require("webpage"); var async = require("async");
The first two modules are provided by PhantomJS. system is how you interact with the machine. It’s what you use instead of process in Node. webpage is well, the webpage you are browsing with PhantomJS. async is what I’m using to handle the asynchronous work here.
Setup the destination for the screenshots and the sizes of screenshots desired.
Here is where we use system to get an environment variable or just use screenshots as a default when run locally. CIRCLE_ARTIFACTS is set by CircleCI during the build process. Once the build is done CircleCI will retain any files stored in that location along with the build. I did a short amount of Googling for the iPhone screenshot size so if it’s inaccurate just let me know.
Next startup a new queue.
1 2 3 4
var queue = async.queue(handle); queue.drain = done; queue.pause(); primeTheQueue();
Specify the function that will handle the tasks. I also like to know when the process is complete. That’s what the drain member is for. The done method will be called once all is…well, done. The queue.pause may actually not be required, I have not really tested it but I know it does what it says. It pauses the queue from processing until told otherwise. That last call to primeTheQueue does just that. It loads up the queue with the tasks to process.
Let’s look into how the tasks get into the queue first. Each task object looks like this:
1 2 3 4 5 6
{ name: "Name of page for display purposes", url: "Full url of page to open", page: {PhantomJS webpage object}, size: {width: x, height: y} }
The name and url should be obvious. The page and size are used to indicate a different step in the screenshot generation. I’ll get to them in just a bit so ignore them for the moment. Here is the primeTheQueue function:
var home = webpage.create(); home.open("http://localhost:4000/", function() { var firstPost = this.evaluate(function() { console.log("Getting first article"); returndocument.querySelector("section#main article:first-child a.article-title"); });
I always want screenshots of the home page so just add that immediately. But I also want a screenshot of the most recent post. To get that I need to open the webpage and find that first link. Create the webpage and open to the home page. The callback will then evaluate the css query selection on that webpage. That query selector path is specific to the layout of our website template. So it will be different for you most likely. It just finds the link to the first post on the page. Add a new task object to the queue with an appropriate name and the url from the webpage. I also add an errorOut function to report problems processing that particular task object.
Next let’s take a look at the function that is called for each task object.
Short and simple, it just passes onto an appropriate processing method based on if the url has been opened in PhantomJS already. If it has already been opened, as indicated by a defined task.page member on the task object, then render the page out to file. If it has not been opened then open it.
The open function will be called when a task object is to be processed but it does not have a defined page member. open creates the new PhantomJS webpage object; opens the url specified in the task object; then pushes additional task objects onto the same queue but providing the webpage object used to open that url. Note that it’s not just one task object for each url to open; it’s a task object per url per window size to render. That callback must be called for the queue to know that we have finished with this task object. If there was a problem we could pass the callback function an error object.
Eventually the queue will have to process a task object that has been opened. Which the handle function will pass off to renderPage.
Here we set the size of the page. That simulates the size of the browser window. The clipRect is set taller so that I grab more content. Think of it like taking a screenshot of a web page while scrolling down the page a bit more. Then just tell the page to render to the path defined. Using the name plus size gives me decently unique name for the file. Each build has it’s own artifacts so I’m not going to bump into a file from a previous build with the same name.
The last functions are the ones for when the queue has been drained of all task objects, as well as an error function to report any problems when processing a task.
1 2 3 4 5 6 7 8 9 10 11
function done() { console.log("Done"); phantom.exit(); }
function errorOut(ex) { if(ex !== undefined) { console.log("ERROR on task " + ex); phantom.exit(); } }
Please note that it’s important to put the phantom.exit(); inside the done function. If you put it outside of that (for example at the end of the js file) then your process will just sit there and do nothing. Why is that? Because if phantom.exit(); was outside the functions it would get called before the queue is empty. Which would result in the webpage objects not responding. It’s important to pay attention to what actually happens at what time with asynchronous calls. It can get weird.
Now just run the script.
1
phantomjs screenshots.js
Then check in the artifacts directory (screenshots locally). You should see some image files. Adding this to your CI process will depend on which tool you use. For CircleCI it’s an edit to your circle.yml file.
In CirceCI the test field in your yml file is what they use to run custom tests. What I’m doing here is making sure hexo is available for me to use. I start the hexo server just like you would do locally. This is what PhantomJS will call to get the website.
Note that I specify that background: true field for the hexo server call. That’s special for CircleCI. Each command is a separate SSH connection. So if you just hexo server the hexo server would stop running as soon as the SSH connection closed and moved onto the next command. But with that additional field set CircleCI knows to run that command in the background to keep it going even after the SSH connection closes.
I sleep for a few seconds to give hexo time to generate. Two seconds is plenty of time. Then just run the screenshot script in PhantomJS. Once it’s done the ‘tests’ are complete. CircleCI will gather the artifacts which happen to be screenshots.
There are a few improvements I want to make to this. Namely the ability to do more than just the home and the post, although I may call YAGNI on it. But I would like to use that excuse in order to get a better handle on the asynchronous patterns. I’d also like to make this a NPM package sometime. To make it easier for others to utilize this functionality.
In my next post I’ll talk about using node.js to send those screenshots to a GitHub PR as a comment. Take a look at some of the closed pull requets on the okcsharp website repository to see what it looks like.
]]>
<p>In this post I continue detailing the <a href="/post/automating-static-sites-with-hexo-io-circleci-and-github-pages/">automation of hexo.io</a> by generating screenshots of the generated site. This is primarily useful when it is run in the continuous integration process so I can quickly check on content submissions.<br>
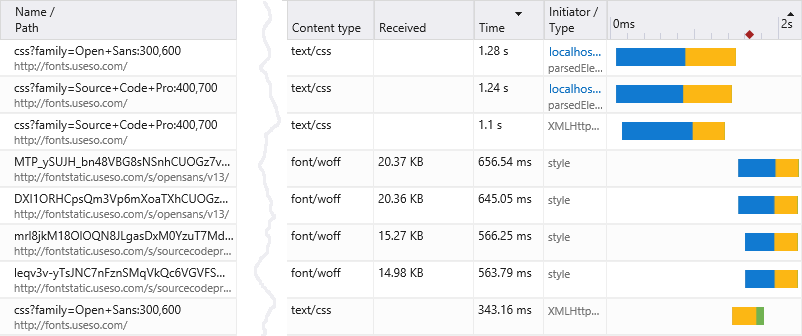
Watch your artifacts web peoplehttp://teapotcoder.com/post/watch-your-artifacts-web-people/2015-11-02T03:55:37.000Z2018-10-03T20:02:25.184ZI just switched to using hexo.io for my personal blog. But something was bugging me. A static site taking six to eight seconds to load? Must fix. At first I thought it was just because I was using the hexo server command to test the site locally. But upon first deploying I still saw the same 6+ second delay in the site completely downloading. I pull up the developer console (happen to be using Edge which is very nice by the way) and look at the network activity of the site. Look at this (removed a few columns for space):
CSS and font files? On a CDN? Taking a total of about six seconds to load? Taking a bit of a deeper look into what the Edge browser is telling me I notice those blue bars on the right. Most of the time connecting to *.useso.com is just connecting. Nothing is going on. Not sending the request or downloading a response. Just waiting for a connection to do anything.
I needed to figure out where the request was being initiated from. At first I thought it was something in my template. Sort of. Searching for fontstatic yielded nothing. But I did find some useso.com stylesheets references. If you look at the network activity again you’ll see under the Initiator/Type it says ‘style’ for some of those font files. That means a style sheet is specifying the url. The other top ones are from ‘localhost’ (testing the site) so it’s directly from my HTML. If you follow the path (mentally speaking):
Browser loads HTML
HTML specifies stylesheet
Browser loads stylesheets (top three from above)
Stylesheet specifies font url
Browser loads fonts (next five from above)
Visitor closes page because my blog takes to long to load.
Nothing here to see.
So if I remove the stylesheet reference I solve the problem. But I need the stylesheet right? It came with the template. Unfortunately many of us have tendencies to stick with the default. Well I decide to see how it will affect the page look and feel. I find the stylesheet reference to anything on useso.com and remove them:
Those two reference match the first two requests. Run the site again loading the currently deployed site side by side against my local one and…
Nothing
Not one single difference that is visible or noticable. There are other fonts being used; font awesome for instance. But those two references add no value to my site. They only cost it time. Checked the page load time now and it dropped by a full four seconds. Okay, so not the six seconds to 110 milliseconds I mentioned on twitter.
Page load time: 6 seconds. Remove two CDN css links that use about 4 fonts. Page load time: 135 milliseconds Watch your artifacts people
But it wasn’t until I started writing this that I realized I was comparing network activity with an empty cache to one that had a full cache. Still three seconds is significant. Especially all that connecting time. I still don’t know what that’s all about. Any connections to *.useso.com did that. None of the others showed that kind of waiting to connect; including google analytics and disqus.
To make a long story short; I did some optimization of my static blog because I thought it was taking to long to load (still is). But I did it after I got it working. When I compared the before and after of the removal I knew that I wasn’t going to have to put it back in later on. I didn’t accept the defaults and took a deeper look to make adjustments. But I didn’t go crazy right yet. I will still look into some bundling of stylesheets. Watch what you (and others) put into your websites.
]]>
<p>I just switched to using <a href="https://hexo.io/" target="_blank" rel="noopener">hexo.io</a> for my personal blog. But something was bugging me. A static site taking six to eight seconds to load? Must fix.<br>
Automating static sites with Hexo.io, CircleCI and Github Pageshttp://teapotcoder.com/post/automating-static-sites-with-hexo-io-circleci-and-github-pages/2015-10-31T21:12:05.000Z2018-10-03T20:02:25.183ZI recently became one of the organizers of the OKCsharp user group in Oklahoma City. They use Hexo.io to publish the user group static website onto Github. Hexo is a Node.js package that generates a static site and will update the appropriate gh-pages branch for Github to host.
Hexo.io
I’m not going into the use of Hexo; their website has very good documentation. Pay special attention to the Hexo deployment section. That’s what I will be modifying a bit here in this post.
I handle a large part of the automated development pipeline process where I work fulltime so the idea of doing a git pull and
1
hexo deploy --generate
to deploy the website, although short and simple (much nicer than others I’ve used) is still so manual. It just feels…wasteful.
So I fixed it with continuous integration.
Using CircleCI
I ended up using CircleCI. It’s fast. And I mean super fast. Much faster than TravisCI (and cheaper if you end up needing more). CircleCI will also build pull requests from forks which is awesome (so will TravisCI). Connect CircleCI to your Github account and have CircleCI ‘follow’ the appropriate repository. You will need a circle.yml file in your root of the repository to do this process.
The production name is just for the set of commands for the deployment; it has no other effect. The branch field tells CircleCI which branch this deployment will run for. In this case I only deploy the website when a commit to master is made. So pull requests will not trigger this. This lets us review a PR and then merge it to master when we want to. Then CircleCI handles the rest.
The commands simply contain shell commands needed to deploy the hexo website to Github. That sed command is used to modify the deployment section of the hexo _config.yml file to allow it to deploy to Github with the appropriate token having commit permissions.
It changes the repository field to use basic OAuth.
1
2
3
4
deploy: type: git repository: https://${Value of GH_TOKEN}:x-oauth-basic@github.com/techlahoma/okcsharp-website.git branch: gh-pages
That ${GH_TOKEN} is an environment variable set in the CircleCI web ui. You can generate that token in Github by going to your Github settings then Personal Access Tokens. Put the token into the CircleCI project settings environment variables.
Environment Variable Security
A very important note about environment variables in CircleCI; environment variables specified in the circle.yml are available in fork builds. Environment variables specified in the CircleCI web UI are not available during fork builds. This is a security precaution. Anyone randomly could fork your public repo, modify the commands and have it export your sensitive environment variables to another server.
After updating the hexo _config.yml file to be able to commit to Github appropriately the rest of the commands just run the appropriate hexo commands to generate and deploy the website.
The end result is someone can send us a pull request containing a new post. We look it over and decide to merge it using the Github web UI. CircleCI is notified of that commit and takes care of the rest. In short:
One click hexo deployments
Oh, that sounds like a good name for a talk. But before I get to that I need to mention that I didn’t stop there. In my next post I’ll describe how I generated screenshots of the PR and even put those screenshots onto the PR as a comment.
]]>
<p>I recently became one of the organizers of the <a href="http://okcsharp.net" target="_blank" rel="noopener">OKCsharp</a> user group in Oklahoma City. They use <a href="http://hexo.io" target="_blank" rel="noopener">Hexo.io</a> to publish the user group static website onto Github. Hexo is a Node.js package that generates a static site and will update the appropriate <code>gh-pages</code> branch for Github to host.<br>
How I got in the world of softwarehttp://teapotcoder.com/post/how-i-got-in-the-world-of-software/2015-03-30T05:00:00.000Z2018-10-03T20:02:25.183ZNow, this is the story all about how My life got flipped-turned upside down And I’d like to take a minute, just sit right there I’ll tell you how I became a coder in the world of software In Oklahoma City, from a small computer store On a XT dual floppies where I learned my trade Hackin’ out, thinkin’, learnin’ the bits And writin’ a B-ball card app inside BASIC
When I sent in a card to get some college info Called me up saying ‘hey we think we can help you’ I got in one small job a friend thought I’d do well And I said, “This is the work that with life is swell”
I typed out some VB for an inventory app The users said it’s awesome, better than other smack I went on to PHP…..left and never looked back But I learned a lot in there, this world of software
I left that first place after years of six or seven And said to the next place “Yeah I can help ya” Looked inside seeing imposter syndrome start Still building with my co-workers in the world of software
]]>
<p>Now, this is the story all about how<br>My life got flipped-turned upside down<br>And I’d like to take a minute, just sit right there<br>I’ll tell you how I became a coder in the world of software<br>
Developing behind a proxyhttp://teapotcoder.com/post/developing-behind-a-proxy/2015-03-03T06:00:00.000Z2018-10-03T20:02:25.183ZWorking behind a proxy can be annoying at times but it’s not difficult to work with, most of the time that is. This is mostly here for my own reference in the future and you get the added benefit.
##GIT You need to set two settings to allow git to use your proxy:
Note both of the above settings. http.proxy and https.proxy.
You may also need to turn off secure certificate verification. Why? Some places use a self signed certificates on the proxy for use with internal domain names.
1
git config --global http.sslVerify false
##NPM More proxy settings:
1
2
npm config set proxy "http://[username]:[password]@[address/url]:[port]"
npm config set https-proxy "http://[username]:[password]@[address/url]:[port]"
Turning off secure certificate verification.
1
npm config set strict-ssl false
Thank you to the following for their posts providing the above information:
]]>
<p>Working behind a proxy can be annoying at times but it’s not difficult to work with, most of the time that is. This is mostly here for my own reference in the future and you get the added benefit.<br>
OctoPygmyhttp://teapotcoder.com/post/octopygmy/2015-02-28T06:00:00.000Z2018-10-03T20:02:25.183ZI am a great fan of Octopus Deploy. In the interest of improving it in any way I can I released a beta version of OctoPygmy, a Chrome extension for Octopus Deploy.Right now it has the following features:
Filter the dashboard by project groupings.
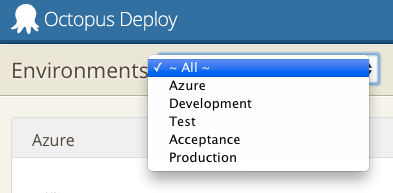
Filter the machines by environment.
Filter the machines by name or role.
Where I work full time we have about 50 projects (never really counted) using Octopus Deploy. For the individual teams the dashboard is fine. They only see what they have access to. But for me and the team I’m on. We see all of them. It gets a bit tedious scrolling every where to find the right project that needs looking into on occasion. The dropdown that OctoPygmy adds makes it much easier to focus on the projects at hand for us.
Similar item for the machines (Tentacles). We have about 70+ machines at the moment being used with Octopus Deploy. There are many more in the company but not for apps. The environment dropdown helps focus on the environment and then the filter by name and role helps even further.
I’ve read other articles where they have configurations with well over a 100 machines spread across multiple countries. I’m blown away by the scale that others are becoming much more effective and deploying more often in a repeatable way with Octopus Deploy. I hope that this extension finds them and helps them with their larger scale use of Octopus Deploy.
It’s open source on github at davidroberts63/OctoPygmy. If you’d like to lend a hand just add an issue and lets talk a bit before you put work into it so we are all on the same page. Right now with this initial version 0.6 the source is not ideal. I want to do a few things before adding some more features, without to much of a delay that is:
Add unit tests
Get it on a continuous build, maybe Travis-CI or AppVeyor
Refactor the code to get DRYer
Look into moving away from the mutation events to start using the mutation observer.
Later on I’d like to get a better logo for it. The round circle with eight sided starburst in the middle is what I (non-artist graphic person) did in five minutes using Sketch.io.
]]>
<p>I am a great fan of Octopus Deploy. In the interest of improving it in any way I can I released a beta version of OctoPygmy, a Chrome extension for Octopus Deploy.
The case for abstract IoChttp://teapotcoder.com/post/the-case-for-abstract-ioc/2014-12-15T06:00:00.000Z2018-10-03T20:02:25.184ZI really value the IoC libraries out there and the features each one provides. I use one in nearly all the applications I write. Along with IoC libraries there has been the occasional discussion on abstracting it away from the application. I’m not a fan of this idea. By abstracting the IoC I mean to abstract out the registration of classes and the resolving of the types during runtime. If I did both then I would lose the features of the library I chose because the abstraction has to go to the lowest common denominator of IoC features. Once I lost those features then I wonder why I picked that library over any other library at all.
Many frameworks (ASP.NET MVC, Nancy, FubuMVC) do abstract out the IoC. Mostly just the resolving of types but some also do the registration as well. Doing that in the framework is fine because it’s intended to be used by many different types of applications. But in the application itself I see no reason to abstract out the registration of classes. The rest of the application should rely on the dependency injection the IoC provides. Any application factories can require an abstracted resolver since that should just be providing the ability to resolve a type.
If I try to convince myself that abstracting the IoC library would be beneficial I simply remember that I will always have to learn the new IoC library API. I feel the abstraction would give me a false sense of security when switching IoC libraries. If switching IoC libraries turns out to be difficult then I likely used the IoC in the wrong way in my application.
I’ll keep the registration of classes in the IoC soley in my application startup, keep the unique features of the IoC library and know what the IoC is doing with my classes.
The case for abstracting IoC libraries doesn’t exist for my application, but it can for a framework.
]]>
<p>I really value the IoC libraries out there and the features each one provides. I use one in nearly all the applications I write. Along with IoC libraries there has been the occasional discussion on abstracting it away from the application. I’m not a fan of this idea.<br>
I did TDD wronghttp://teapotcoder.com/post/i-did-tdd-wrong/2014-10-13T05:00:00.000Z2018-10-03T20:02:25.183ZMy mind still thinks procedurally.
I like TDD, I really do. I’m just doing it wrong. TDD is about DRIVING the design. But many people (and evidently myself) just do it in a ‘Test First’ way. That really doesn’t give you much of an advantage other than a higher code coverage.Which is nice on it’s own. However you don’t really get the full benefit that TDD is going for. Driving the design by using your tests doesn’t say ‘You need to write the test first’, it requires that to be done by it’s definition in order for your test to drive the design. I will give a recent example of my own that illustrates the point.
I needed to create a process that would inform people of updates to things. Let’s just say it is updates to RSS feeds you follow. In a procedural way and mentally I imagine for most of us it would go like this.
Get the list of RSS feeds to find updates about
Go get the updates about those RSS feeds
Associate the updates to the people that want to know about them
Tell the people about their RSS feed update.
How I did it the wrong way was I wrote some tests first to make sure I could get the updates about the RSS feeds (second step). This was done in a class definition. At first this seems okay, and it was for the most part. Where I failed is the next thing I did. I wrote a test for the first step (list of rss feeds) WITHOUT a test that made me need to do that step. This is the important part. If you don’t write a test that causes you to need to do that step stop writing. The test driving the design should fall across something that is missing at some point. It might be a method, a class, a whole library, anything. Many times writing the test will likely not compile (in whatever fashion your language compiles) when you discover the next step.
With TDD you should write a test to accomplish that first goal and drive the design to something effective, simple and maintainable. Nothing more and nothing less. Don’t think about the latter steps. Just focus on that one. Then do it again for any requirement to get that first step to complete. Repeat that process for each subsequent step. Also, focus in on one thing. Don’t try to stuff everything into one flow. When you get done with step one consider that you may be done with that thing/class/object. You may in fact need to have a separate object for the next step.
As you complete each step of your process you can and should look at how you solved it and potentially refactor the code. Remember refactoring is not intended to change behavior; just how you go about accomplishing the behavior. Your test should change minimally if at all.
]]>
<h4 id="My-mind-still-thinks-procedurally"><a href="#My-mind-still-thinks-procedurally" class="headerlink" title="My mind still thinks procedurally."></a>My mind still thinks procedurally.</h4><p>I like TDD, I really do. I’m just doing it wrong. TDD is about DRIVING the design. But many people (and evidently myself) just do it in a ‘Test First’ way. That really doesn’t give you much of an advantage other than a higher code coverage.
Show & Tell: Powerargshttp://teapotcoder.com/post/show-tell-powerargs/2014-06-27T05:00:00.000Z2018-10-03T20:02:25.184ZAbout a month ago I finished a contribution to the PowerArgs project and wrote about it. A week or two later I thought it would be a great idea to make my first screen cast about it.
The PowerArgs project is a very nice one and I plan on contributing more to this project as I hope you will consider the same. I also hope you consider using it in your projects where you need command line parsing.
I learned a lot from this first screen cast of mine. I am going to look into Screenflow, iShowU, or Camtasia depending on how often I do screencasts. Also trying to figure out how to handle it with my Windows VM on the Mac. Any suggestions are appreciated.
Thanks for watching and hope you have a great day! Come back again.
]]>
<p>About a month ago I finished a contribution to the <a href="http://github.com/adamabdelhamed/PowerArgs" target="_blank" rel="noopener">PowerArgs</a> project and <a href="/fork-pull-powerargs">wrote about it</a>. A week or two later I thought it would be a great idea to make my first screen cast about it.<br>
Fixing my own blunder with powershellhttp://teapotcoder.com/post/fixing-my-own-blunder-with-powershell/2014-06-16T05:00:00.000Z2018-10-03T20:02:25.183ZI installed a service a while back that uses Java. When I installed it I followed with a flow of installing Java to a different path from the default (oh no). There are different reasons for that which have now been totally debunked. The service that uses java (Subversion Edge in this case) has a windows service with a path to Java at the time (the non default path). Then a patch got applied.
It uninstalled the original one and installed the updated one in the default location. So now the windows service is trying to run Java from a location that no longer exists. So how does one fix such a problem given that you can’t change the path the windows service is using from the user interface?
When using the Invoke-WmiMethod it’s important to know what the order of parameters is. What’s documented may not be correct. so use $theService.GetMethodParameters("Change") to determine the proper order. Ignore those that start with an underscore.
All of this is in very good detail at Jeffery Hicks’ blog about this.
On a side note be sure to use Start-Transcript when working on stuff like this. It’s wonderful to be able to go back and read everything that you did and what the outcome of it was.
]]>
<p>I installed a service a while back that uses Java. When I installed it I followed with a flow of installing Java to a different path from
Vagrant for development environmentshttp://teapotcoder.com/post/vagrant-for-development-environments/2014-06-08T05:00:00.000Z2018-10-03T20:02:25.184ZI have been using Vagrant for my development environments for about six months now. It’s a wonderful setup that eases the ability to keep different configurations separate as well as to keep my host machine clean from inadvertent changes. When I do the lite development with Ruby or Python I use Vagrant to manage the runtime environment. I continue to actually write the code using my host machine. This way I can use my Sublime and other development tools setup across all the development machines. Then I can quickly change the runtime, testing environment without affecting the writing envirnonment.
You can use the ‘config.vm.synced_folder‘ property in the Vagrantfile to keep a host folder synced up as a mounted folder on your guest Linux machine. From that point if you clone your repository into that folder on your host machine You will also have them in your guest machine.
You may also keep your Vagrantfile under version control. Just check it out to a separate folder. I do this so I can use the same vagrant setup for multiple environments when needed.
Vagrant checkout of Ruby Vagrant config (Vagrantfile and puppet/ansible config)
/Users/johndoe/devenvironments/rubydev
Ruby project checkout
/Users/johndoe/development/my-project
I set the ‘config.vm.synced_folder’ to the /Users/johndoe/development folder. Change to the rubydev folder on my host and vagrant up. In the vm I can change to that dir using the name I specified in the vagrantfile. In this case /development
I continue writing in my host but runtime, web server (via forwarded ports) and testing are in the vm. This does cause me to switch between host and guest when checking test results or dealing with gems. I would like to get growl setup to talk to the host from the guest so that my test results show as I’m writing within my host machine. But that’s for a later time.
Note this also works for .NET development in Windows. Same principle just a different OS. I’m currently using Puppet to manage the configuration. Not sure of the road map of Windows support in Ansible yet.
]]>
<p>I have been using <a href="http://www.vagrantup.com/" target="_blank" rel="noopener">Vagrant</a> for my development environments for about six months now. It’s a wonderful setup that eases the ability to keep different configurations separate as well as to keep my host machine clean from inadvertent changes.<br>
Strong Naming .NET and Key Containershttp://teapotcoder.com/post/strong-naming-net-and-key-containers/2014-06-03T05:00:00.000Z2018-10-03T20:02:25.184ZThere’s a lot of documentation about strong naming .NET assemblies. Most talk about using an open strong name file (snk). Some talk about the password protected file (pfx). Even fewer mention the key container. I’ll just get right to the situation and the point.
I’m strong naming assemblies primarily so they can be added to the GAC. Can’t let the full pfx sit on the developers’ laptops for security concerns. Delay signing just seems like it’s going to cause more troubles than it is worth. Since we are using a central build server I’m just telling msbuild to sign the assemblies on the fly. Yeah for automation!
When you do that by specifying the AssemblyOriginatorKeyFile msbuild property and that file is password protected (a pfx file) then msbuild will complain about the password. It will also tell you that you can import it into a key container with a name that msbuild has specified. So I do that. Well, not me really but the security team. They are the ones with the password anyway.
The import is tied to the contents of the file. Not the file name or the path.
Now from my thinking the key is inside that key container; so I don’t need to use the AssemblyOriginatorKeyFile property anymore right? To back that up there is another msbuild property called AssemblyKeyContainerName, heck there’s even one called AssemblyKeyName although that’s in an extension pack. So out with AssemblyOriginatorKeyFile and in with AssemblyKeyContainerName.
Nope.
Doesn’t work. No one’s going to tell you directly either.
I assumed something. We all know what that means.
If you do import the password protected pfx into that key container then you still must specify that AssemblyOriginatorKeyFile pointing to the pfx file. MSBuild will look in its container for the private key data corresponding to that file you specified and the container it told you earlier.
Oh and the AssemblyKeyContainerName msbuild property does absolutely nothing as far as I can tell. I wish it did because the container name that msbuild wants (VS_KEY_RANDOMALPHANUM) is nice and ugly.
]]>
<p>There’s a lot of documentation about strong naming .NET assemblies. Most talk about using an open strong name file (snk). Some talk about the password protected file (pfx). Even fewer mention the key container.
Fork & Pull: Powerargshttp://teapotcoder.com/post/fork-pull-powerargs/2014-05-29T05:00:00.000Z2018-10-03T20:02:25.183ZI came across the PowerArgs command line parsing .NET library while exploring the latest updated repositories on Github looking for a project to contribute to. Checking its pulse was encouraging and it had a simple enough issue for me to cut my teeth on for the project.It was not until halfway through my work on that issue that I discovered that the attention grabbing project ScriptCS uses it. Wonderful! I say to myself and forge ahead improving the project the little bit that I can.
Oh, and it has tests. Note to other projects, you have tests? Yes? Good, thank you. That helps me know when I screw up.
You can see by the execptions issue comments that someone else was trying to get to this item. However it seemed as though time eluded that individual. I do hope that person is able to contribute in the future.
I prefer to give some notice of intent to contribute so as to avoid duplication of work if someone else is already working on it. A few days to give others a chance to chime in sounded like a decent notice and that it was. Adam is nice to work with. Responded in a good amount of time and was appreciative of my contribution. I’m glad he asked what my approach to the issue would be as this is a good sign of project invovlement and forces contributors to think a bit before making serious modifications.
I did make some changes to the tests that are a bit different from the rest of the tests. Any tests that I touched I renamed to describe what was being tested in a bit more detail. Following the ‘ThingDoesActionWhenSituation’ and ‘ThingThrowsWhenSituation’ somewhat. Also adusted how some of the assertions were being performed. I see a lot of people (in several other projects) using Assert.IsTrue when an AreEqual can provide better feedback when the test fails. AreEqual will tell you what the actual data that came back is so you can better determine what the problem is.
I did offer to revert the naming and assertion changes I had made. They are my opinonated changes but I will always defer to the owner and main contributors to follow the project style if they request. It’s important to balance moving the code in a direction with keeping it consistent across contributors. This helps the readability of the code so you don’t find your self context switching just because someone else wrote the code.
I may end up working on another issue multiple shortcuts. Glenn Block himself has requested it. I might just contact him online to see if it’s still an issue for him.
Overall, I’m glad that I was able to help. I hope to help some more. Take a look at it yourself and make your command line argument parsing so much easier. You can get it via Nuget as well. I’ll be posting a short 10 minute video on it as sort of a show and tell soon so be sure to keep an eye out for that as well.
]]>
<p>I came across the <a href="http://github.com/adamabdelhamed/PowerArgs" target="_blank" rel="noopener">PowerArgs</a> command line parsing .NET library while exploring the latest updated repositories on <a href="http://github.com" target="_blank" rel="noopener">Github</a> looking for a project to contribute to. Checking its <a href="http://github.com/adamabdelhamed/PowerArgs/pulse" target="_blank" rel="noopener">pulse</a> was encouraging and it had a simple enough <a href="https://github.com/adamabdelhamed/PowerArgs/issues/11" target="_blank" rel="noopener">issue</a> for me to cut my teeth on for the project.
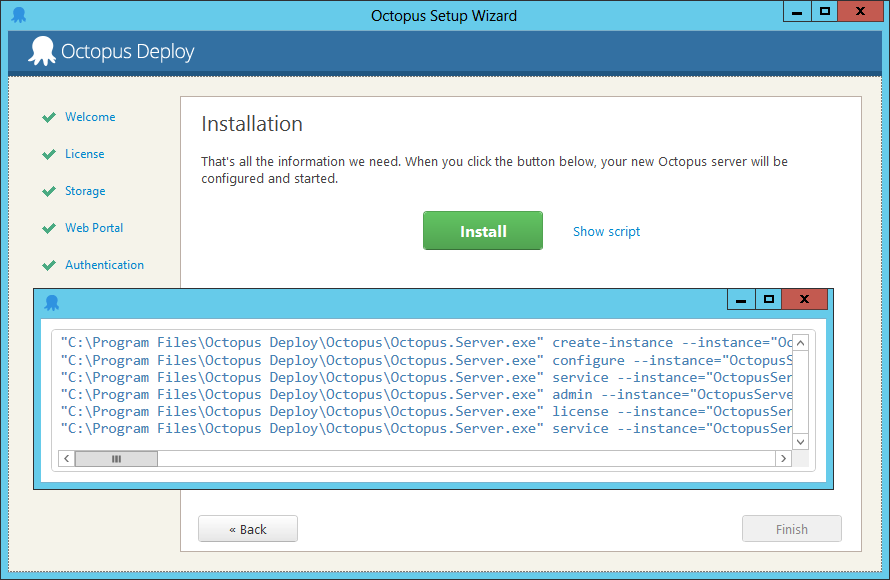
Automated Install of Octopus Deploy Serverhttp://teapotcoder.com/post/automated-install-of-octopus-deploy-server/2014-05-13T05:00:00.000Z2018-10-03T20:02:25.182ZI have been using Octopus Deploy for a while at work and now upgrading to their 2.0 line. It’s a wonderful product and you should check it out if you haven’t yet. One of the things I always want to do is automate the install of application infrastructure items (such as this) so that I can burn and build the servers. This allows me to be better prepared for server outages. One of the great things about Octopus Deploy 2.X is that at the end of the server configuration wizard you have the option to get the script to reproduce the configuration.
The only missing part is the actual installation of the Octopus Deploy server files. The running of the msi. It’s simple enough to automate as most msi installers are:
Notice that I take the given script and use it within Powershell. Using the Start-Process with the -Wait and -Verb RunAs keeps the commands running in sequence and as the running account. Powershell needs to be running as an administrator in this case or it won’t install.
Then run your script that you got from the Octopus Setup Wizard. Here’s my complete script:
The only thing I have not figured out is how to set the RavenDb backup location via this wizard or command line configuration. You can do it via the website api (though I have not verified it myself yet). The only problem is that you won’t know what the admin user api key is until you logon to the website. At that time you might as well just set the backup location manually. It is not a problem, just a small change that I know I will always do.
Overall I really like this installation process, especially the providing of the script. It was very simple and fluid. The Octopus Deploy team puts a lot of thought into this and it shows.
If you don’t see the embedded gists above just use the links. I’m having a bit of trouble with embedded gists at the moment
Update
I just caught up on my blog reading and the Octopus Deploy team has released the server and tentacle as Chocolatey packages. If your server can access chocolatey.org then it’s even easier. Check the octopus blog for details. http://octopusdeploy.com/blog/cinst-octopusdeploy
]]>
<p>I have been using Octopus Deploy for a while at work and now upgrading to their 2.0 line. It’s a wonderful product and you should check it out if you haven’t yet. One of the things I always want to do is automate the install of application infrastructure items (such as this) so that I can burn and build the servers. This allows me to be better prepared for server outages.<br>
NancyFX Testing with an authenticated userhttp://teapotcoder.com/post/nancyfx-testing-with-an-authenticated-user/2014-05-08T05:00:00.000Z2018-10-03T20:02:25.183ZI’ve been trying NancyFx lately and ran across a bit of a misunderstanding on my part and a minor missing point in the Nancy documentation. I’m testing my modules and some require authentication. By way of:
1
this.RequiresAuthentication();
The Authentication documentation for Nancy states that if the NancyContext.CurrentUser property is null then the current request has not been authenticated otherwise the request has been authenticated. Well, not quite. Nancy checks that CurrentUser property for null. It also checks that the UserName property is not empty. So be sure that your identity has the UserName set which is almost always the case.
But for testing I usually setup the minimum amount of data required to keep the distractions as low as possible. What I also do for testing is create a custom bootstrapper just for use in my tests.
That bootstrapper sets up every request with a logged in user. So I don’t have to do it on every request in my tests on the BrowserContext.FormsAuth. What I initially did in the bootstrapper was not specify a UserName for the current user. Everything kept getting redirected to the login page. Once I set the username everything started working correctly in my tests.
For those that may be interested the code in Nancy that does the actual checking for an authenticated user is the UserIdentityExtensions.cs file in Nancy.Security.
]]>
<p>I’ve been trying <a href="http://nancyfx.org" target="_blank" rel="noopener">NancyFx</a> lately and ran across a bit of a misunderstanding on my part and a minor missing point in the Nancy documentation. I’m testing my modules and some require authentication.